Indian roti is a traditional flatbread that holds a central place in Indian cuisine. Made from whole wheat flour, water, and sometimes a little oil. Roti is typically cooked on a flat griddle known as a “tava.” It’s soft, round, and versatile, served with a wide range of curries, vegetables, and lentils. Roti is a staple in Indian households, valued for its simplicity, nutritional benefits, and ability to complement both rich and mild dishes. Whether enjoyed plain or with a dollop of ghee, it’s an essential part of daily meals across India.
Cooking Video
I grew up with Indian Roti
Since my childhood, I’ve watched my mother make roti twice a day—once in the morning for breakfast and again for dinner. While breakfast could sometimes go without roti or paratha but an essential part of dinner. In India roti is a crucial element of every Indian family’s meal and in some places people prefer roti over rice. It’s not only a cultural staple but also a healthy part of any diet, rich in good carbohydrates and fiber making it both nutritious and satisfying.
 Recipe – Easy & Authentic")
The dough is where the magic happens
Making perfect roti starts with the dough. I use whole wheat flour and water. I slowly mix the flour and water, adding a little water at a time to avoid it getting too sticky. Once mixed, I knead the dough for about 7-8 minutes. Take your time – kneading makes the dough soft. When the dough feels smooth and bounces back when pressed, it is done. I cover it with a cloth and let it rest for 15-20 minutes.
 Recipe – Easy & Authentic")
Rolling: The perfect balance of shape and patience
After resting, I make small, lemon-sized balls from the dough. The key is to roll them smoothly between your palms—no cracks! Next, I dust the surface and dough ball with dry flour to prevent sticking. Using a rolling pin, I start from the center and roll in all directions, turning the dough slightly after each roll to keep it round. If the edges become uneven, I gently press them with my fingers and roll again.
 Recipe – Easy & Authentic")
Pro tip: Don’t press too hard—soft hands help make thin roti.
Cooking: The Right Balance of Heat and Time
I use a cast iron pan because it spreads heat evenly. Before cooking, I wipe it with a cloth to remove any dust. Keep the flame on medium—too hot, and the roti will burn; too low, and it will turn dry.
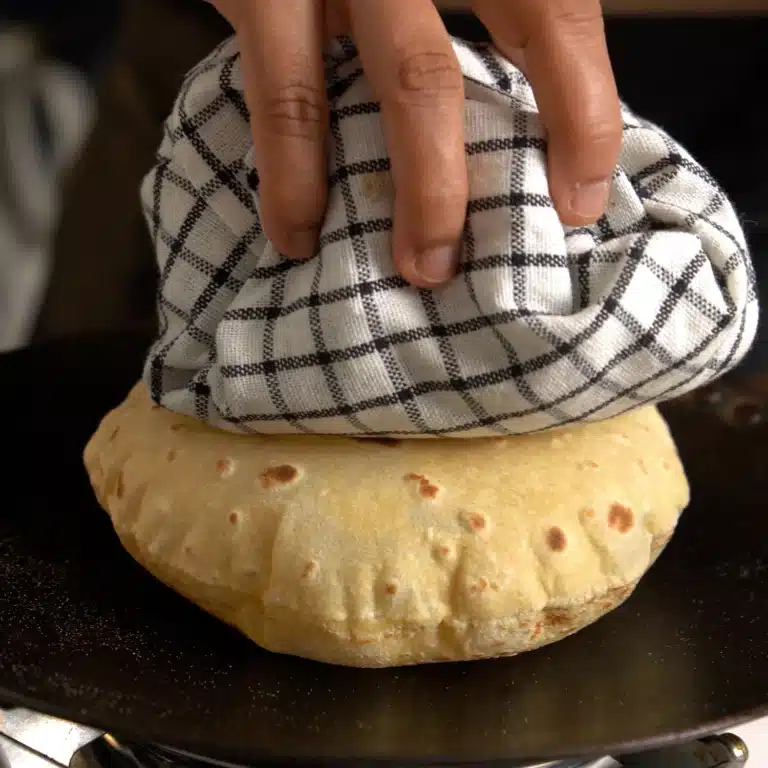
I place the roti on the pan and wait about 20 seconds until small bubbles appear, then flip it. Once the other side develops light brown spots, I use tongs to place the roti directly on the flame. This is where the magic happens—it puffs up like a balloon! If you don’t have a gas stove, gently press the roti with a cloth while it’s still on the pan to help it puff up.
My simple rules for making fluffy Indian roti
- Let the dough rest: When the dough doesn’t rest, the roti will be hard.
- Roll the roti evenly: Thick edges or a thin center will stop the roti from puffing up.
- Medium heat: If the heat is too high, the roti will burn, and if it’s too low, the roti will get dry.
- Serve right away: Roti tastes best when fresh, so serve it as soon as it’s ready.
 Recipe – Easy & Authentic")
What to do if the roti doesn’t puff up? Don’t worry
If your roti doesn’t puff up, don’t stress! Even experts have bad days.
- The dough must be too dry (Add a little more water next time.).
- The pan is not hot enough (Heat it properly next time).
- You rolled it unevenly (keep practicing, and you’ll get better).
Why homemade roti is the best every time
Store-bought roti can never match the taste of hot, soft homemade Indian roti. It’s fluffy and pairs perfectly with curries or butter. There’s something special about learning this art, passed down through generations.
Things to know
-
How is roti different from naan or paratha?
Roti is unleavened and lighter, made without yeast or stuffing. Naan is leavened and often cooked in a tandoor, while paratha is layered or stuffed and cooked with more oil or ghee.
-
What flour is used to make roti?
Typically, atta (Indian whole wheat flour) is used. It’s finely ground and soft, perfect for making rotis.
-
Why doesn’t my roti puff up?
Your dough might be too dry, not kneaded enough, or the pan isn’t hot enough. Puffing happens when moisture inside turns to steam, so soft dough and proper heat are key.
-
Can I make rotis without a tawa?
Yes! You can use a cast iron skillet or non-stick pan—just make sure it’s hot before cooking.
-
How do I keep rotis soft for longer?
Cover them with a clean cloth as soon as they’re cooked. You can also apply a little ghee or butter to lock in moisture.
-
Can I store rotis?
Yes! Wrap in foil or a clean towel and keep in an airtight container. You can refrigerate or freeze them and reheat as needed.
Recipe
 Recipe – Easy & Authentic")
Indian Roti
Ingredients
- 1 cup Wheat Flour
- Water as per needed
- 1 tablespoon Olive Oil
Instructions
- In a bowl take whole wheat flour. Slowly add water and mix it while kneading to form a soft dough.
 Recipe – Easy & Authentic")
- Add a little oil and knead again until smooth.
- Divide the dough into small, equal-sized balls.
- On a lightly floured surface roll each ball into a thin, round shape with a rolling pin.
- Heat a flat pan (tawa) and place the rolled roti on it. Cook one side until bubbles form then flip it, Now cook the other side and press gently with a cloth or spatula. Optionally you can puff it directly over a flame for a few seconds.
- Once lightly browned and cooked, remove from heat and serve hot with your favourite curry or just as a wrap.
- For a visual reference you can watch our video linked below.
- Enjoy😋
 Recipe – Easy & Authentic")
 Recipe – Easy & Authentic")
 Recipe – Easy & Authentic")
 Recipe – Easy & Authentic")
 Recipe – Easy & Authentic")
 Recipe – Easy & Authentic")
 Recipe – Easy & Authentic")
 Recipe – Easy & Authentic")
 Recipe – Easy & Authentic")
Video
NUTRITION INFO
Enjoy this BUTTER CHICKEN recipe with roti
Other Indian recipes for you


Leave a Comment